ABRASIVES GUIDE

Storage and Handling Best Practices for Industrial Abrasives

Damp, contaminated blast media silently erodes productivity — it clogs metering valves, ruins surface profiles, and drives up abrasive consumption. A discipline...

Published
26 Apr 2026
Category
Abrasives
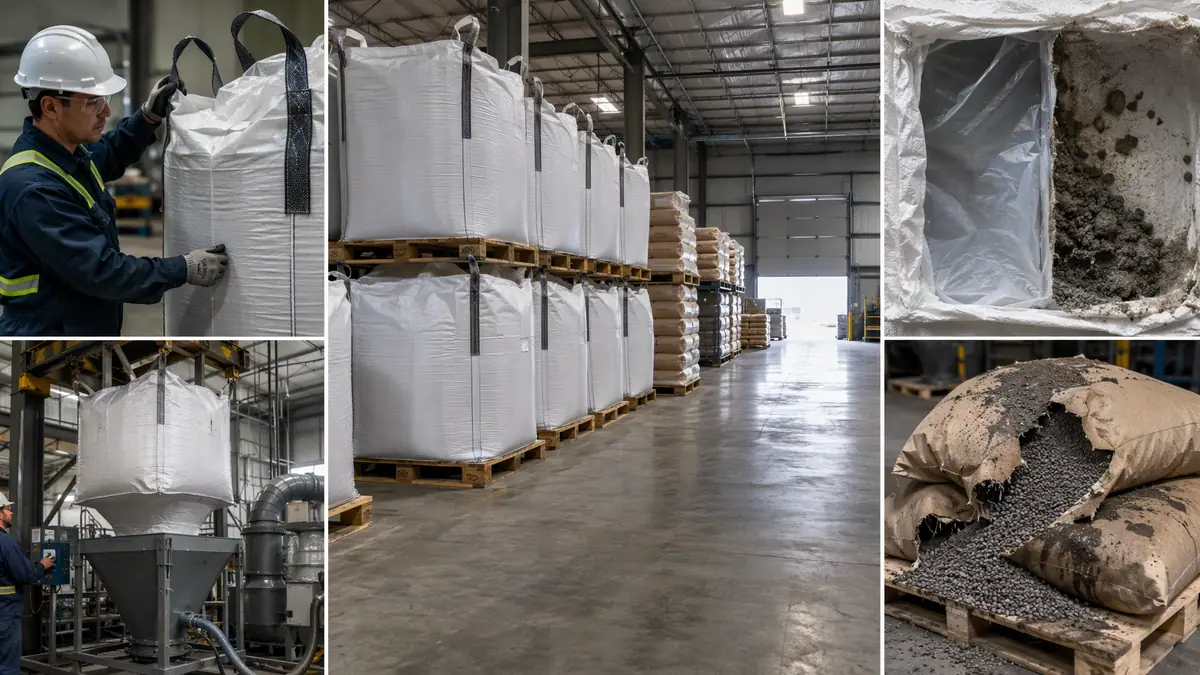
Multi-panel collage showing best practices for industrial abrasive storage, including sealed bulk bags on pallets, moisture p
FIG. 01A visual guide to proper abrasive storage...

Featured image for an article on abrasive storage best practices. The multi-panel industrial collage depicts key SOPs: warehouse storage of palletized bulk bags, inspection of packaging integrity, the importance of moisture barriers, dust-free transfer to a blast pot hopper, and the consequences of

Introduction

Damp, contaminated blast media silently erodes productivity — it clogs metering valves, ruins surface profiles, and drives up abrasive consumption. A disciplined storage and handling routine is the lowest-cost way to protect blasting quality before…

Introduction

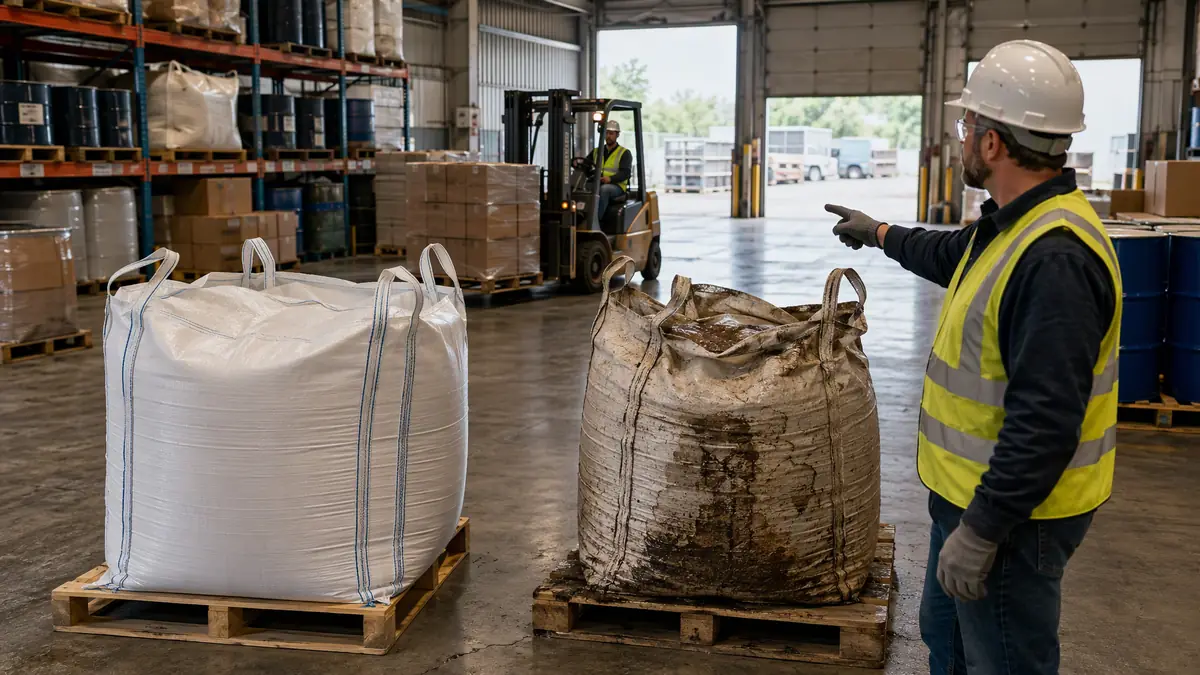
Warehouse supervisor comparing a pristine bulk bag of abrasive with a moisture-damaged one on a warehouse floor.
The condition of abrasive media upon use is determined long before it reaches the blast pot. Proper storage prevents costly damage.

An industrial warehouse scene introducing the topic of abrasive storage. A supervisor contrasts a new, undamaged bulk bag with one that has been compromised by poor storage, visually representing the article's focus on preventing moisture, contamination, and packaging degradation.

Warehouse supervisor comparing a pristine bulk bag of abrasive with a moisture-damaged one on a warehouse floor.

Every abrasive blasting operation depends on one variable that is often overlooked until it causes a problem: the condition of the media itself. Whether you stock aluminum oxide grit, garnet sand, steel shot, or steel grit, how you receive, store, and move that material through your warehouse directly affects blast speed, surface finish consistency, and equipment wear. Moisture intrusion, cross-contamination, and mechanical degradation of packaging are the three most common threats — and all three are preventable with straightforward, repeatable procedures.

This article is written for warehouse supervisors, stores personnel, and blasting team leads who manage abrasive inventory. It covers practical storage SOPs, handling precautions, and the packaging decisions that keep blast media dry, free-flowing, and fit for purpose.

Why Abrasive Storage and Handling Matters

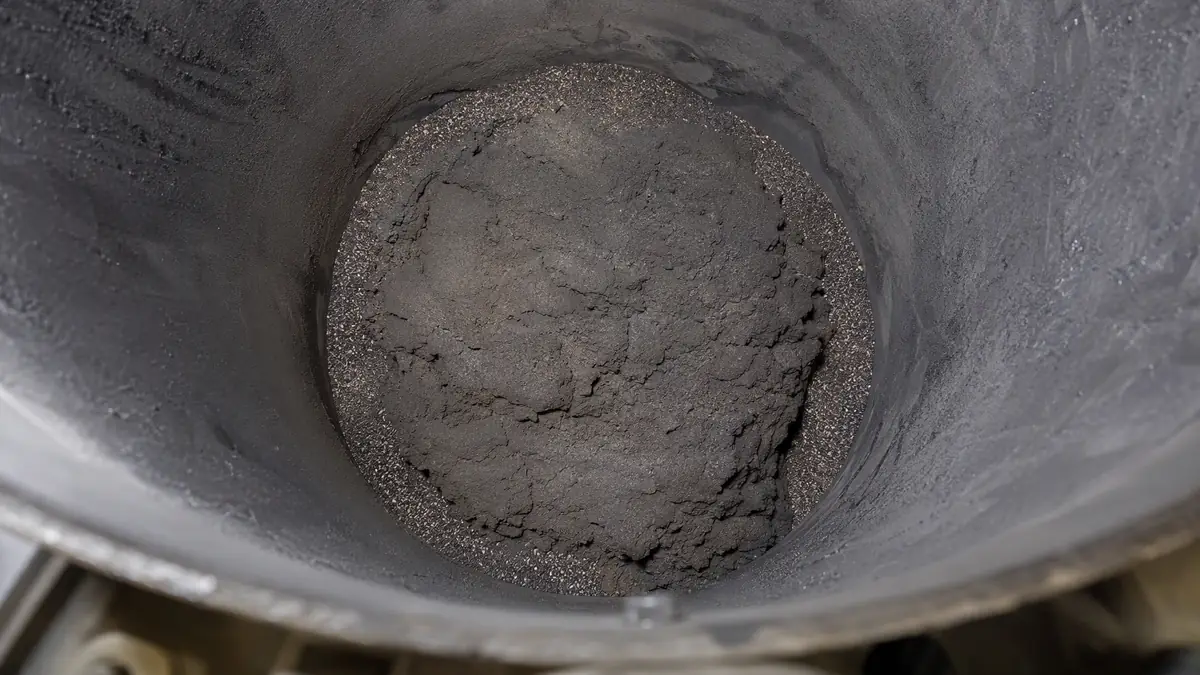
Close-up view inside a blast pot hopper showing damp abrasive media caking and bridging over the metering valve.
Moisture causes caking and bridging, leading to uneven abrasive flow, pressure surges, and complete blockages in the blast pot.

A detailed macro shot illustrating a key consequence of poor abrasive storage. Damp media has clumped into a solid mass inside a blast pot hopper, bridging over the metering valve and preventing flow. This visualizes the operational problems of uneven blasting and equipment wear caused by moisture.

Close-up view inside a blast pot hopper showing damp abrasive media caking and bridging over the metering valve.

Abrasive media is hygroscopic to varying degrees. Mineral abrasives like garnet and aluminum oxide can absorb ambient moisture, while metallic media — steel shot and grit — are prone to surface oxidation when stored wet. The consequences of poor storage cascade quickly:

  • Moisture causes caking and bridging. Damp media clumps inside blast pots, hoppers, and metering valves, producing uneven abrasive flow and pressure surges.
  • Contamination ruins surface profiles. Foreign particles — dust, rust flakes, or a stray handful of a different grit size — create inconsistent anchor patterns that coating inspectors will reject.
  • Packaging failures waste material and labour. Split bulk bags or punctured paper sacks spill product, introduce floor debris, and demand costly re-handling.
  • Equipment wear accelerates. Wet or contaminated abrasive erodes nozzles, hoses, and blast wheel components faster than clean, dry media.

For any facility running blasting operations, the cost of a dedicated, dry storage area is negligible compared to the cost of rework, downtime, and wasted abrasive.

Understanding the Enemies: Moisture, Caking, and Contamination

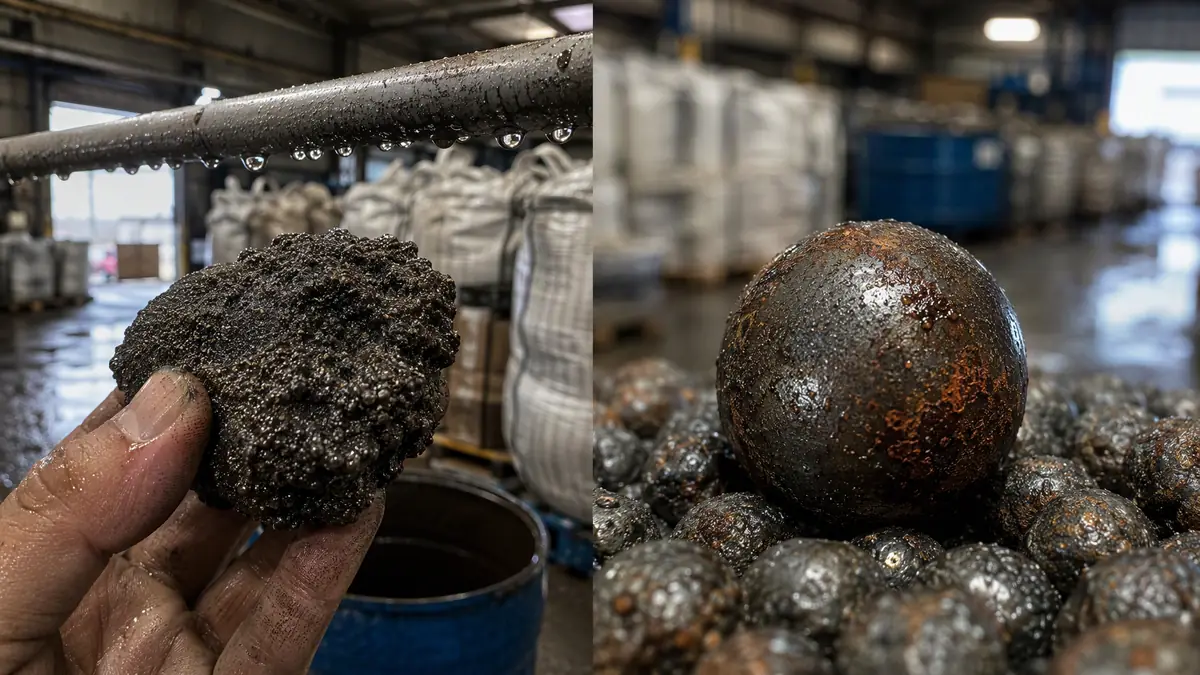
Split comparison showing a clump of caked abrasive grit and a rusted steel shot particle, caused by moisture in a warehouse.
The two primary threats: mineral abrasives cake into solid lumps, while metallic media like steel shot develop surface rust when exposed to moisture.

A comparative image illustrating the dual threat of moisture on abrasives. One side shows a solid, caked lump of mineral grit, demonstrating particle binding. The other side shows a close-up of oxidized, rusted steel shot. The blurred background of a damp warehouse environment connects the visible d

Split comparison showing a clump of caked abrasive grit and a rusted steel shot particle, caused by moisture in a warehouse.

Moisture

Moisture is the primary enemy of stored abrasive. It enters through humid ambient air, rain ingress, condensation cycles, or direct contact with wet floors. Once inside a bulk bag or sack, moisture initiates two problems: it causes mineral grains to stick together (caking), and it triggers surface rust on ferrous metallic media. Even slight dampness changes the flow characteristics of the material, making it impossible to maintain consistent metering at the blast pot.

Caking

Caking is the physical binding of abrasive particles into lumps or solid masses. It occurs when soluble salts or fine dust within the media dissolve in absorbed moisture and then recrystallize as the media dries, cementing grains together. Caked abrasive will not gravity-feed reliably. It must be broken up — often manually — which introduces labour, downtime, and the risk of adding foreign material to the mix.

Contamination

Contamination takes several forms: mixing different abrasive types or grit sizes, ingress of floor sweepings or dust, rust from corroded storage racks, and even oil mist from nearby machinery. Once contaminated, abrasive cannot be "un-mixed." The entire batch may need to be discarded or downgraded to non-critical work. For operations that must meet surface preparation standards such as SSPC-SP 10 or ISO 8501-1 SA 2.5, contaminated media is a direct threat to specification compliance.

Packaging Types and Their Role in Storage

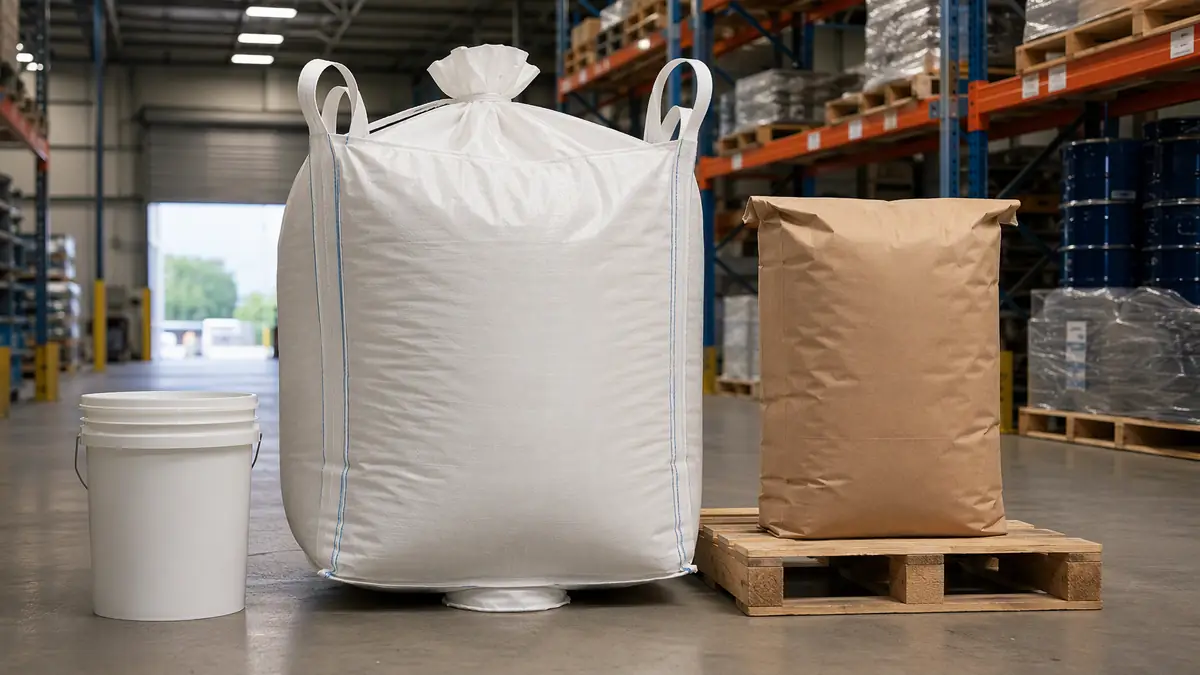
Three types of industrial abrasive packaging: a large bulk bag, a plastic bucket, and a multi-wall paper sack on a pallet.
Different packaging types—bulk bags, buckets, and sacks—offer varying levels of moisture protection and handling characteristics for abrasive storage.

A comparative product shot showcasing common abrasive packaging. A large Flexible Intermediate Bulk Container (FIBC) with a discharge spout is the focal point, flanked by a sealed plastic bucket and a paper sack on a pallet. The image helps warehouse personnel identify packaging and understand its r

Three types of industrial abrasive packaging: a large bulk bag, a plastic bucket, and a multi-wall paper sack on a pallet.

The packaging in which abrasive arrives — and how it is handled afterward — determines how well the material withstands warehouse conditions.

Bulk Bags (FIBCs)

Flexible Intermediate Bulk Containers, commonly called bulk bags or jumbo bags, are the standard for high-volume abrasive users. They typically hold 1,000 kg or more and are designed with lifting loops for forklift or overhead crane handling.

Advantages for storage:
- Integral liner options provide a moisture barrier.
- Discharge spouts allow controlled emptying into blast pot hoppers.
- Stackable (when designed for it) to save floor space.

Risks:
- UV degradation of the polypropylene fabric if stored outdoors, leading to catastrophic failure when lifted.
- Punctures from forklift tines or sharp edges on racking.
- Condensation inside the bag if moved from a cold yard into a warm warehouse.

Best practice: Store bulk bags indoors on pallets, never directly on concrete. If outdoor storage is unavoidable, use a covered area and inspect bag integrity before every lift. Bags with polyethylene liners offer the best moisture protection for mineral abrasives.

Paper Sacks and Multi-Wall Bags

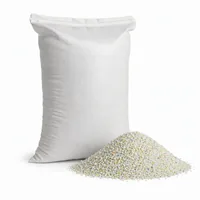
Smaller quantities — typically 25 kg — are supplied in multi-wall paper sacks, sometimes with an inner polyethylene ply.

Advantages:
- Convenient for low-consumption or multi-media operations.
- Individual sacks keep unused material sealed until needed.

Risks:
- Paper sacks tear easily and absorb moisture from floors and humid air.
- Stack collapse if lower sacks become damp and lose structural strength.

Best practice: Store sacks on pallets, off the floor, in a dry area. Rotate stock on a first-in, first-out (FIFO) basis. Once opened, decant the entire sack into a dedicated, sealed hopper or container — do not leave partially full sacks open to ambient air.

Drums and Pails

Some specialty abrasives, particularly fine-mesh powders for thermal spray or precision blasting, are supplied in sealed steel or plastic drums.

Advantages:
- Excellent moisture and contamination barrier.
- Stackable and robust against handling damage.

Risks:
- Steel drums can rust internally if the lining is damaged.
- Plastic drums may become brittle with age or UV exposure.

Best practice: Keep drums sealed until the moment of use. Store indoors, away from heat sources. Inspect drum integrity on receipt; reject any with dents that may have compromised the internal lining.

Warehouse Storage SOP: Practical Guidelines

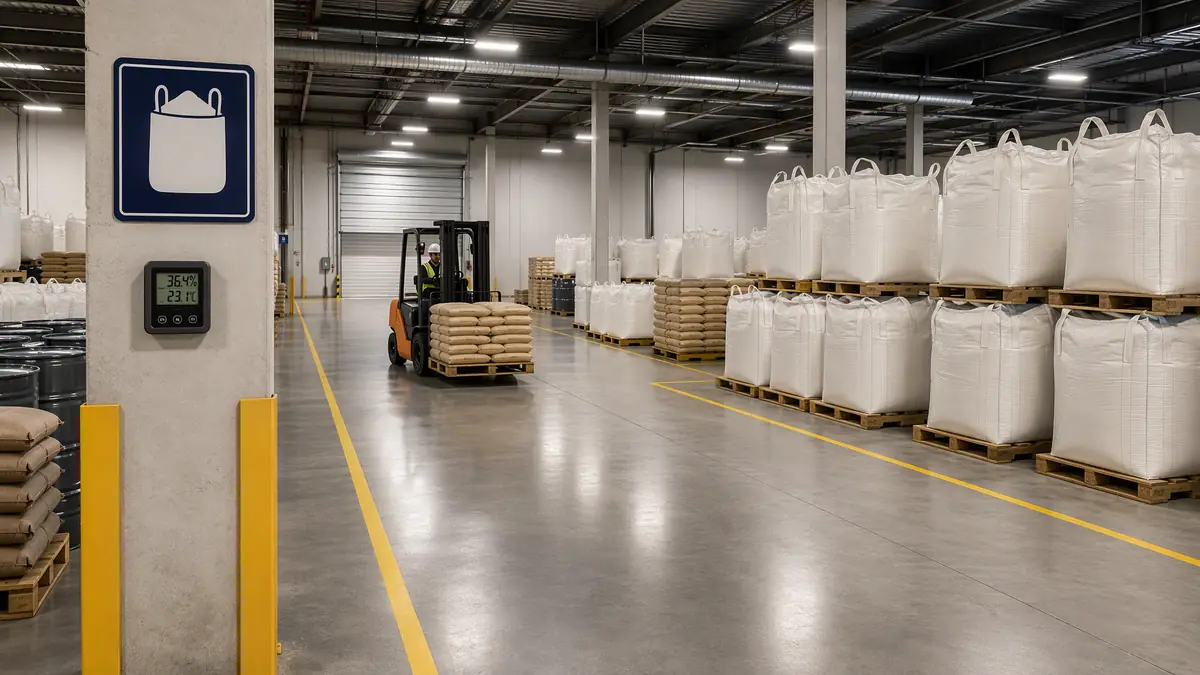
A clean, organized indoor abrasive storage zone with palletized bulk bags, sealed floor, and a forklift in a designated aisle
A model storage SOP: a dedicated, enclosed area with a sealed floor, low humidity, and safe, organized pallet stacking away from walls and pipes.

An ideal representation of a warehouse abrasive storage SOP. The scene shows a dedicated, enclosed area with a sealed concrete floor, clear safety markings, and neatly stacked pallets of abrasive away from walls. A hygrometer indicates a controlled, dry environment, and a forklift navigates a clear

A clean, organized indoor abrasive storage zone with palletized bulk bags, sealed floor, and a forklift in a designated aisle

A structured storage protocol does not require expensive infrastructure. It requires consistent habits and clear accountability.

1. Designate a Dedicated Abrasive Storage Zone

The ideal abrasive store is a covered, enclosed area with a roof, walls on at least three sides, and a sealed concrete floor. It should be:
- Dry, with relative humidity ideally below 60% (confirm against your abrasive supplier's recommendation).
- Free from overhead water pipes, steam lines, or roof leaks.
- Separated from areas where grinding dust, welding spatter, or chemical fumes are generated.
- Accessible by forklift or pallet truck for safe handling of bulk bags.

If a fully enclosed space is not available, use heavy-duty tarpaulins or pallet covers — but recognize these are temporary measures, not a substitute for indoor storage.

2. Keep Everything Off the Floor

Place all abrasive packaging — bulk bags, sacks, and drums — on pallets or raised racking. Concrete floors transmit moisture and are cold enough to cause condensation on the underside of bags. Wooden pallets provide an air gap that prevents moisture wicking. Inspect pallets for protruding nails or splinters that could puncture bags.

3. Segregate by Type and Grit Size

Store different abrasive types (e.g., aluminum oxide, steel grit, garnet) in clearly marked, physically separated zones. Within each type, segregate by grit or mesh size. A single misdirected scoop of coarse grit into a fine-mesh bin can contaminate the entire batch.

Use visible signage and floor markings. Label bulk bag discharge spouts and hopper inlets with the abrasive type and size. Colour-coding — for example, red tags for steel grit, blue for aluminum oxide — reduces handling errors when multiple media are in use.

4. Control Temperature and Condensation

If abrasive is delivered cold (e.g., from an unheated truck in winter), allow it to acclimatize inside the warehouse before opening. Moving cold media into a warm, humid environment causes condensation to form on the grains. A 24-hour acclimatization period is a typical rule of thumb; adjust based on local conditions and packaging type.

5. Inspect on Receipt and Before Issue

Build a five-point receiving check into your goods-in procedure:
1. Packaging intact? No tears, punctures, or water stains.
2. Labels legible and matching the purchase order?
3. Pallet condition acceptable?
4. Any signs of moisture inside the bag or drum? (Check through sight windows or by feel.)
5. Lot or batch number recorded for traceability?

Reject or quarantine any shipment that shows signs of water damage or packaging failure. Issuing compromised abrasive to the blasting crew guarantees a quality problem downstream.

Handling Practices That Protect Media Quality

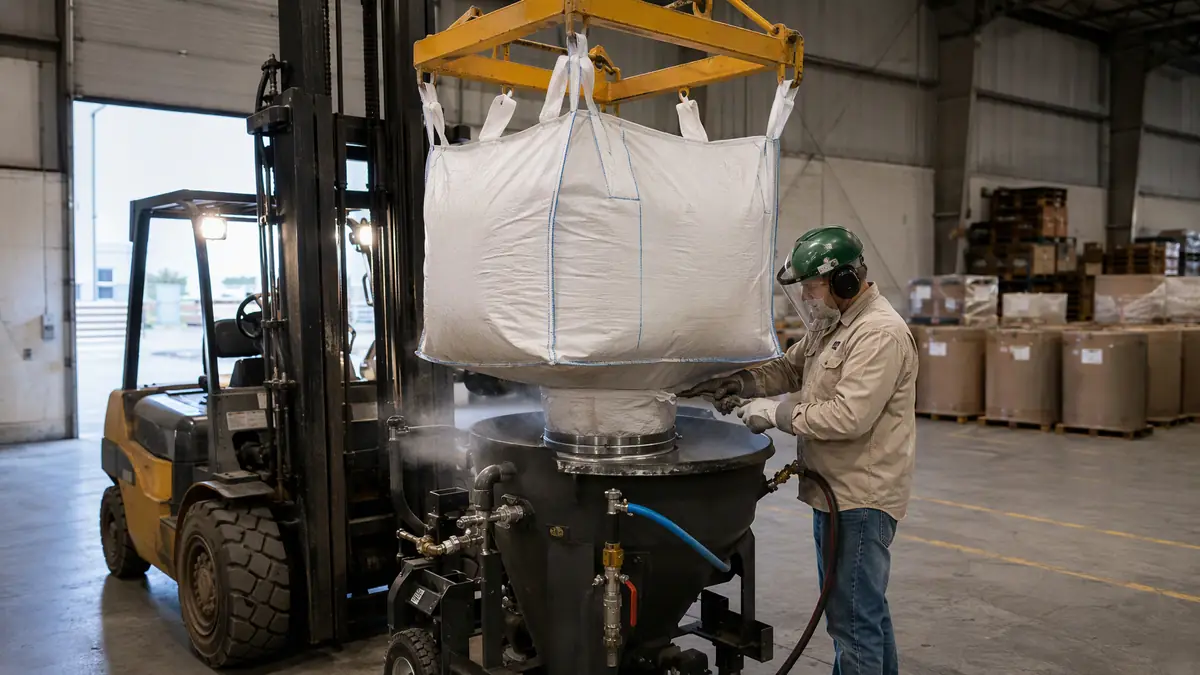
Worker in PPE untying a bulk bag discharge spout secured inside a blast pot hopper for a dust-free abrasive transfer.
Safe handling practice: using a lifting frame, the bulk bag's spout is secured inside the hopper before opening to minimize dust and contamination.

An image demonstrating a critical handling SOP. A bulk bag is correctly suspended over a blast pot hopper using a proper lifting frame. The discharge spout is clamped inside the hopper mouth, and a worker in full PPE is untying it, ensuring a controlled, dust-minimized transfer that protects media q

Worker in PPE untying a bulk bag discharge spout secured inside a blast pot hopper for a dust-free abrasive transfer.

Storage is only half the equation. How abrasive is moved, opened, and transferred determines whether it reaches the blast pot in the same condition it left the warehouse.

Safe Bulk Bag Handling

  • Use a forklift with the correct lifting attachment or a dedicated bag-lifting frame. Never lift a bulk bag by a single loop — this stresses the fabric and can cause tearing.
  • When positioning a bulk bag over a blast pot hopper, lower it until the discharge spout is inside the hopper mouth before untying. This minimizes dust release and prevents foreign material from being drawn into the hopper.
  • After partial discharge, re-seal the spout. Many operations use a simple cable tie or spout clamp. Do not leave the spout hanging open.

Transfer and Decanting

  • Use dedicated scoops, funnels, and transfer containers for each abrasive type. A scoop used for steel grit should never be used for garnet without thorough cleaning.
  • When decanting from sacks into day-use hoppers, avoid pouring from height — this generates dust and can cause segregation of particle sizes within the hopper.
  • Keep hopper lids closed when not actively filling. An open hopper is an invitation for workshop dust, moisture, and debris.

Spillage Control

Spilled abrasive should be swept up immediately — but never returned to the clean stock. Floor sweepings contain dust, metal fragments, and whatever else is on the warehouse floor. Designate a clearly marked "spillage" container and dispose of or downgrade the contents appropriately.

Common Mistakes and How to Avoid Them

Mistake 1: Storing abrasive outdoors under a tarpaulin.
Tarpaulins trap condensation, flap in the wind, and are easily displaced. The result is damp, contaminated media. If outdoor storage is the only option, invest in a shipping container or a purpose-built lean-to with a raised floor.

Mistake 2: Mixing new and old stock in the same hopper.
Topping up a blast pot hopper with fresh abrasive without first running it low risks mixing media that may have absorbed moisture or fines from the previous batch. Adopt a "run low, then refill" discipline.

Mistake 3: Ignoring FIFO stock rotation.
Abrasive left at the back of the store for months can absorb moisture even in apparently dry conditions. Rotate stock so that older material is used first. Mark receipt dates clearly on bulk bags and pallets.

Mistake 4: Using the same handling equipment for all media without cleaning.
Cross-contamination between abrasive types is a leading cause of surface finish inconsistency. Dedicate scoops, funnels, and transfer bins by media type, or implement a documented cleaning procedure between changeovers.

Mistake 5: Assuming "dry" means "fit for use."
Abrasive that feels dry to the touch may still contain enough absorbed moisture to affect flow. If you observe inconsistent metering, bridging in the hopper, or unusual dust levels, test a sample by sealing it in a clear plastic bag and leaving it in the sun — condensation inside the bag indicates problematic moisture content.

Evaluating Your Current Storage Setup

A quick self-assessment can reveal vulnerabilities before they cause a job rejection:

  • Walk the abrasive store after heavy rain. Any damp patches on the floor or walls?
  • Check bulk bag undersides for moisture staining or mould.
  • Open a sack from the bottom of a pallet stack and feel the media. Is it free-flowing or clumped?
  • Review your last three months of blasting quality issues. Can any be traced to media condition?
  • Ask the blasting crew: have they noticed inconsistent feed, unusual dust, or surface finish variation that correlates with a particular batch or storage location?

The answers will tell you whether your storage practices are protecting your abrasive — or quietly undermining your blasting operation.

Conclusion

Abrasive storage best practices are not complicated, but they demand consistency. Keep blast media dry by storing it indoors, off the floor, and sealed until use. Prevent contamination through segregation, dedicated handling equipment, and strict FIFO rotation. Inspect packaging on receipt and before issue — a five-minute check can save hours of rework.

For warehouse and stores teams, the goal is simple: every kilogram of abrasive that reaches the blast pot should be in the same condition as the day it left the supplier. When storage and handling are treated as part of the quality system — not an afterthought — blasting productivity, surface finish consistency, and abrasive consumption all move in the right direction.

Frequently Asked Questions

What is the most important rule for storing industrial abrasive media?

Keep it dry and off the floor. Moisture is the primary enemy, causing mineral abrasives to cake and metallic media to rust. Always store all packaging types—bulk bags, sacks, and drums—on pallets or raised racking inside a dedicated, covered, and dry storage area to prevent condensation and moisture wicking from concrete.

Can I store bulk bags of abrasive outside if I cover them with a tarp?

Outdoor storage is not recommended and should be a temporary measure only. Tarps can trap condensation and bulk bag fabric degrades under UV sunlight, risking catastrophic failure when lifted. The best practice is indoor storage in a dry, enclosed area. If unavoidable, ensure the area is well-covered, inspect bag integrity before every lift, and use bags with internal polyethylene liners.

How do I prevent different grit sizes from getting mixed up in the warehouse?

Segregate abrasives by type and grit size in clearly marked, physically separated zones. Use visible signage, floor markings, and color-coded tags on discharge spouts and hoppers. A single misplaced scoop of coarse grit can contaminate an entire batch of fine media, ruining surface profiles and potentially causing coating adhesion failures.

What should I check when a new shipment of abrasive arrives?

Perform a five-point inspection: check that packaging is intact with no tears or water stains, labels are legible and match the order, pallets are in good condition, there are no signs of internal moisture, and record the lot number for traceability. Quarantine any shipment with water damage or packaging failure to prevent quality problems downstream.

Why is my blast media clumping and clogging the metering valve?

Clumping, or caking, is almost always caused by moisture. When damp media dries, dissolved salts and fine dust recrystallize, cementing grains together. This prevents consistent gravity feeding. The solution is to ensure media is stored in a dry environment and to let cold media acclimate to the warehouse temperature for about 24 hours before opening to prevent condensation.

What is the safest way to empty a bulk bag into a blast pot?

Use a forklift with a proper lifting frame, never a single loop. Lower the bag until the discharge spout is fully inside the hopper mouth before untying it to control dust and contamination. After dispensing a partial amount, always re-seal the spout with a cable tie or clamp to protect the remaining media from moisture and debris.

How long can I leave a partially used paper sack of abrasive open?

You should not leave it open at all. Once a paper sack is opened, you should decant the entire contents into a dedicated, sealed, and labeled hopper or container. Paper sacks easily absorb ambient moisture and the bag itself loses structural integrity, risking spills and contamination of the remaining media.

What is the next step after setting up a proper storage area?

After implementing these storage and handling SOPs, the next step is to review your abrasive selection for the specific surface preparation standards you need to meet. You can browse related abrasive product pages for detailed specifications or contact a specialist to confirm the optimal media type and size for your application.

Solution

Review your current abrasive storage area against the guidelines in this article. Identify the single biggest vulnerability — whether it is moisture ingress, cross-contamination risk, or packaging damage — and address it first.

When you are ready to evaluate abrasive products that arrive in packaging designed for long-term storage integrity, explore the abrasive range available at SPA2Z. For technical confirmation on media compatibility with your storage conditions or blasting application, contact the SPA2Z team with your requirements.

Get a quote

Get a quote

Tell us what you need. We reply within one business day.

Sending…
Need a price? Ask us here.