ABRASIVES GUIDE

How to Measure and Control Spent Abrasive Contamination

Spent abrasive contamination silently erodes surface preparation quality, causing coating failures that cost far more than fresh media. This guide gives quality...

Published
04 May 2019
Category
Abrasives
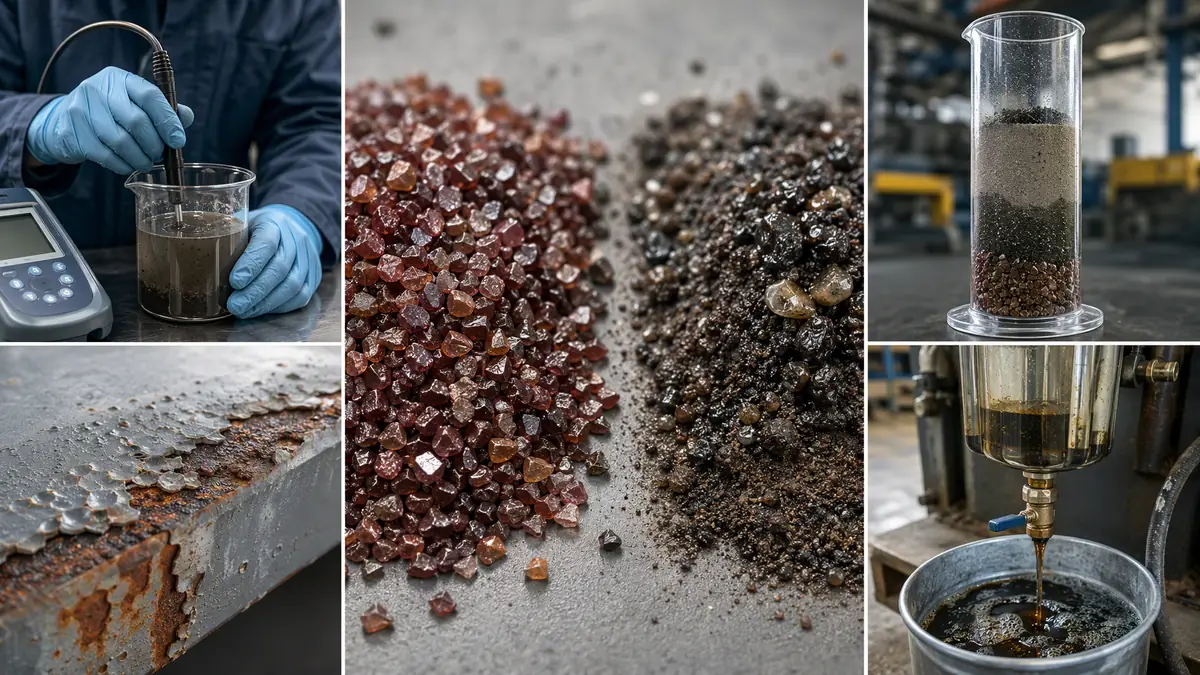
Multi-panel industrial collage showing clean versus contaminated abrasive grit, conductivity testing, stratified media sample
FIG. 01A visual guide to spent abrasive contamina...

Professional multi-panel editorial image for an article on measuring and controlling spent abrasive contamination. Shows a dominant comparison of clean and contaminated abrasive grit, alongside a conductivity test, stratified media sample, blistered coating failure, and compressed air contamination

Introduction

Spent abrasive contamination silently erodes surface preparation quality, causing coating failures that cost far more than fresh media. This guide gives quality and maintenance engineers practical, plant-floor checks to assess recycled abrasive befo…

Introduction

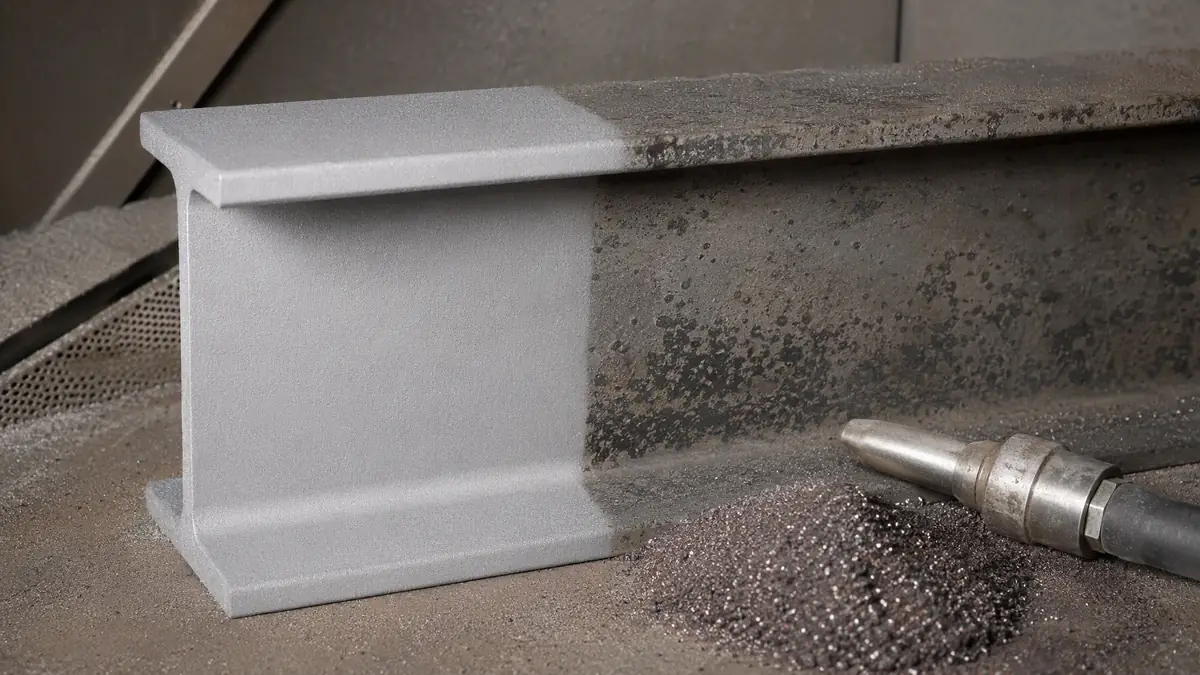
Steel I-beam showing contrast between clean blast profile and stained, contaminated surface from spent abrasive.
The visible consequence of spent abrasive contamination: a non-uniform surface profile with embedded debris and staining that will cause premature coating failu

Photorealistic close-up of a steel I-beam in a blast room, showing a clear visual comparison between a clean, uniform blast profile and a stained, contaminated surface caused by spent abrasive, illustrating the introduction's core problem of undetected contamination.

Steel I-beam showing contrast between clean blast profile and stained, contaminated surface from spent abrasive.

If your blast operation recycles abrasive, you have almost certainly dealt with a frustrating pattern: the same blast parameters that produced a clean, uniform profile last week are now leaving stains, embedding debris, or failing a chloride test. The root cause is rarely the equipment. It is the gradual accumulation of contaminants in the working mix.

For quality and maintenance engineers, the challenge is twofold. First, you must detect contamination before it creates a coating defect. Second, you must decide when the media is still salvageable and when it must be discarded. This article explains what spent abrasive contamination is, which contaminants matter most, and how to run practical checks that fit into a production schedule without a full laboratory.

What Is Spent Abrasive Contamination?

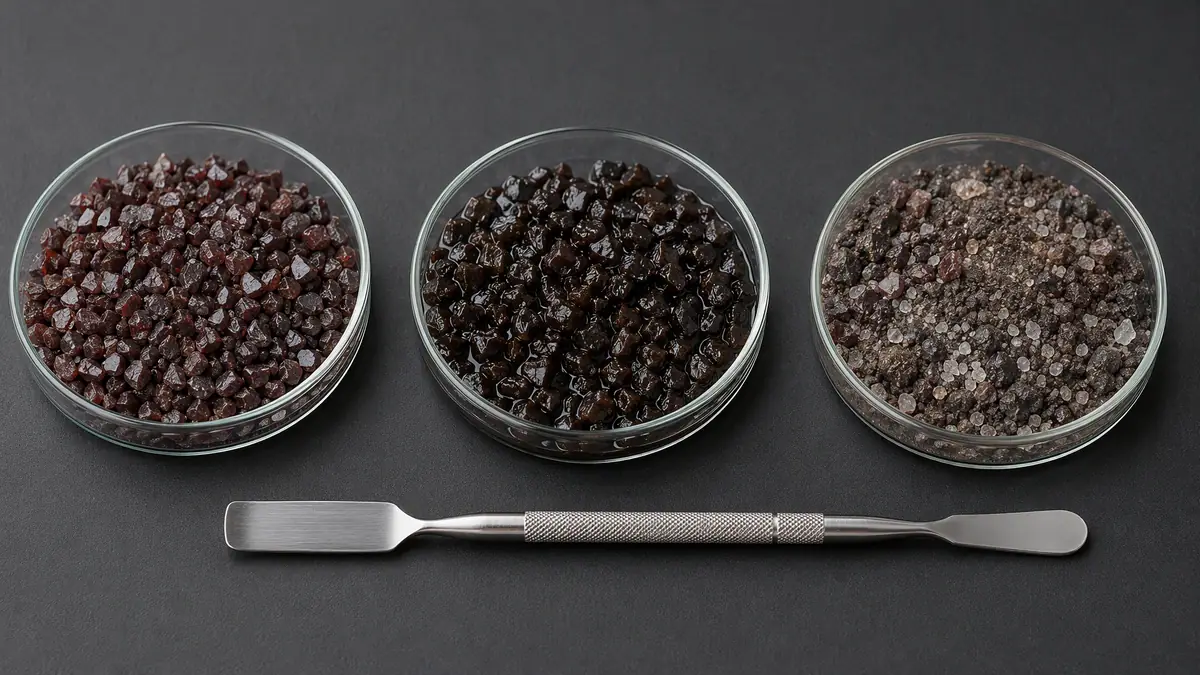
Three petri dishes comparing clean abrasive, oil-contaminated abrasive, and dusty salt-contaminated abrasive.
Spent abrasive contamination takes multiple forms: clean grit (left), oil-coated grit (center), and fractured dust with salt deposits (right).

Macro photograph of three petri dishes on a black inspection table showing the three categories of spent abrasive contamination: clean sharp grit, oil-filmed grit, and dusty fractured particles with salt crystals, visually defining the article's core concept.

Three petri dishes comparing clean abrasive, oil-contaminated abrasive, and dusty salt-contaminated abrasive.

Spent abrasive contamination refers to any foreign material that accumulates in recycled blast media during use and interferes with surface preparation quality. It is not simply worn-out abrasive. A grit particle can be the correct size and still carry a surface film of oil, a chloride salt, or a fractured dust particle that will end up trapped in the coating system.

The contaminants that concern quality engineers fall into three broad categories:

  • Soluble salts (chlorides, sulfates): transferred from the original substrate, deposited by compressed air moisture, or introduced through poor media handling. Chlorides are the most commonly measured because they drive osmotic blistering under coatings.
  • Oils and greases: introduced by compressors, handling equipment, or the workpiece itself. Even a thin film on abrasive particles transfers to the blasted surface and compromises coating adhesion.
  • Fines and dust: the fractured fragments of abrasive and removed coating that become too small to contribute to the profile. Excessive fines reduce cutting efficiency, generate dust, and can become embedded in the surface.

Conductivity is the aggregate measurement that often flags a problem before individual contaminants are identified. When the conductivity of a media slurry rises above a threshold, it signals that soluble ionic contamination has reached a level worth investigating.

Why Spent Abrasive Contamination Matters

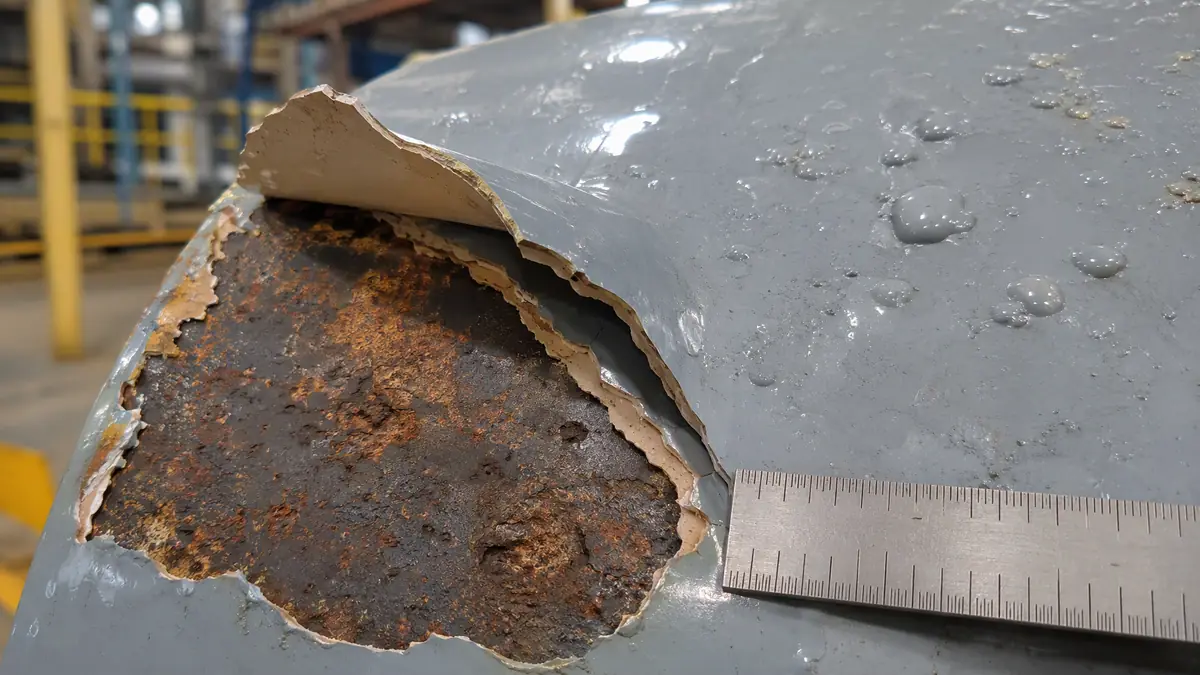
Cross-section of peeling epoxy coating revealing flash rust and pitted steel substrate underneath.
The business cost of contamination: intercoat delamination and osmotic blistering caused by soluble salts trapped under the coating during blasting.

Detailed close-up of a coating failure showing epoxy delamination, flash rust, and osmotic blistering on a steel substrate, visually representing the rework costs and warranty exposure discussed in the section on why contamination matters.

Cross-section of peeling epoxy coating revealing flash rust and pitted steel substrate underneath.

A coating system applied over a contaminated surface carries the defect from day one. The visible consequences—premature rust blooms, intercoat delamination, blistering—may take weeks or months to appear, but the root cause was locked in during blasting.

The business impact is direct:

  • Rework costs: re-blasting and re-coating a failed surface is several times the cost of doing it right the first time.
  • Warranty exposure: coating applicators who cannot demonstrate contamination control may bear liability for early failures.
  • Consumable waste: contaminated media that is not caught early continues to damage workpieces until someone notices the defect. The cost of the abrasive itself is minor compared to the value of the steel it ruins.
  • Production throughput: a media cleanliness test that takes five minutes can prevent a shift of rejected work.

For operations working to surface preparation standards such as ISO 8501 or SSPC specifications, controlling spent abrasive contamination is not optional. It is a prerequisite for achieving and proving the required cleanliness level.

When Recycling Is a Poor Fit

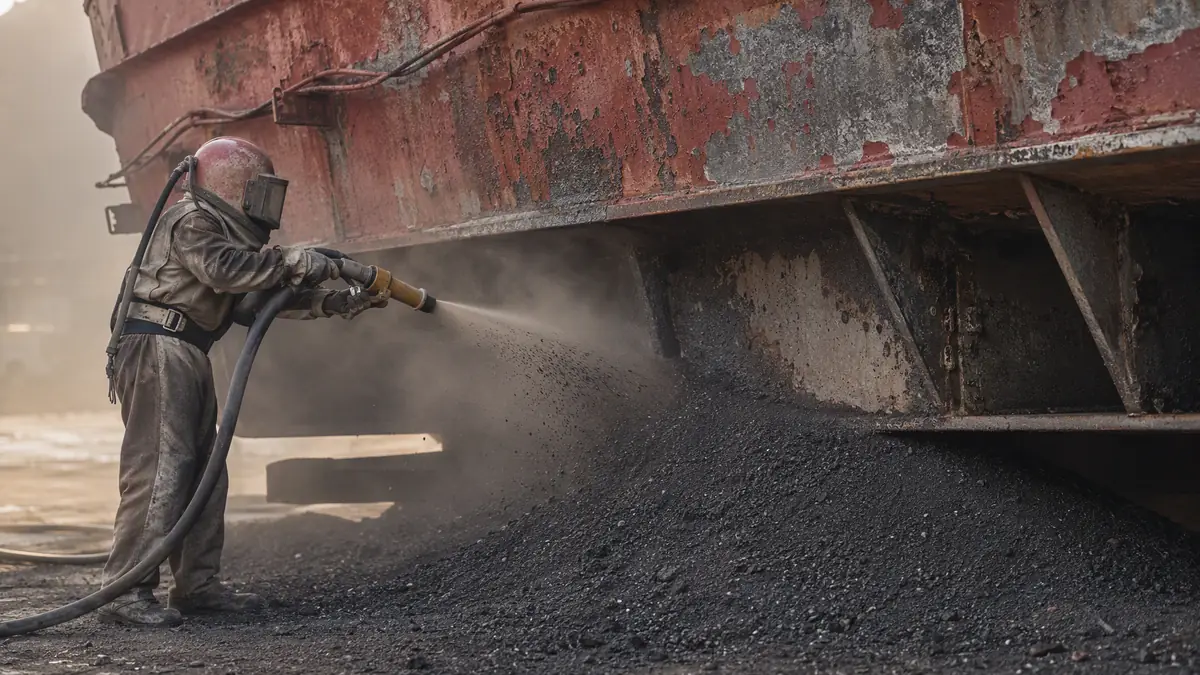
Worker blast-cleaning heavily corroded steel structure with expendable slag, no recycling equipment visible.
Recycling is a poor fit here: heavily contaminated substrates and single-pass outdoor blasting make expendable slag the safer, more economical choice.

Wide-angle photograph of an outdoor blasting operation on a heavily corroded, lead-painted structure using expendable copper slag, illustrating the scenario where recycling abrasive is not suitable due to hazardous contamination and high recovery costs.

Worker blast-cleaning heavily corroded steel structure with expendable slag, no recycling equipment visible.

Recycling abrasive makes economic sense in many operations, but there are situations where the contamination risk outweighs the savings:

  • Single-pass outdoor blasting with expendable slag: copper slag or coal slag used on-site is rarely worth recovering because the cost of collection, cleaning, and testing exceeds the cost of fresh media.
  • Heavily contaminated substrates: blasting surfaces coated with lead-based paint, heavy chlorides, or thick bituminous coatings loads the abrasive with hazards. Recycling may spread contamination and create regulated waste handling problems.
  • Critical coatings with near-zero salt tolerance: some marine or immersion-service coating systems specify extremely low salt limits. In these cases, the safest path is fresh, certified-low-chloride abrasive for the final blast pass.
  • Mixed-media operations: if different abrasive types become mixed in the recycling loop, the resulting blend may have unpredictable hardness, particle size distribution, and contamination profile.

If your operation falls into one of these categories, the contamination checks below still apply, but the economic decision may tilt toward single-use media.

Practical Contamination Checks Before Reuse

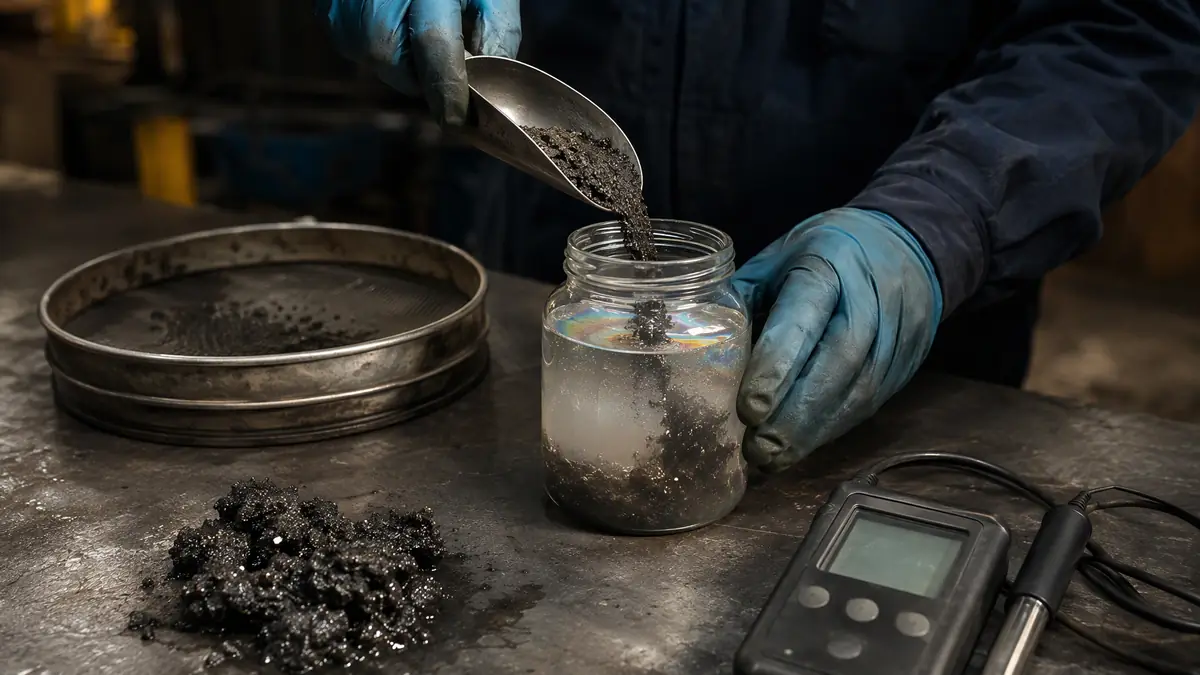
Gloved hands pouring spent abrasive into a jar of water, which clouds with dust and oil sheen.
A simple visual check: pouring spent abrasive into water reveals suspended dust and oil contamination before it reaches the blast nozzle.

First-person view of a technician performing a practical contamination check by pouring spent abrasive into a water jar, showing the resulting cloudiness and oil sheen, with sieve and conductivity meter nearby, illustrating the plant-floor screening methods described in the section.

Laboratory analysis is the gold standard, but a plant-floor screening program catches most problems early. The following tests require minimal equipment and can be performed by blast operators or quality technicians with basic training.

1. Visual and Tactile Inspection

Before reaching for a test kit, look at and feel a sample of the spent media.

  • Color change: abrasive that has darkened significantly may be carrying oil or fine metallic dust. Garnet that turns black has picked up mill scale and steel fines.
  • Clumping: media that clumps when squeezed in a gloved hand often contains moisture or oil. Dry, clean abrasive flows freely.
  • Excessive dust: a cloud of dust when pouring a sample from one container to another indicates a high fines content. This is a quick go/no-go check: if the dust obscures your view of the sample, the fines level is almost certainly too high.

Gloved hands pouring spent abrasive into a jar of water, which clouds with dust and oil sheen.

2. Fines Content by Sieve

A simple sieve test tells you whether the particle size distribution has shifted too far toward dust.

Procedure:
1. Take a representative sample of approximately 200 grams from the working mix.
2. Pass it through a sieve mesh size appropriate for your abrasive grade (for example, a No. 80 mesh for a medium garnet).
3. Weigh the material that passes through.
4. Express the result as a percentage of the total sample weight.

Interpretation: most abrasive manufacturers publish acceptable fines limits for their products. As a general reference, fines exceeding 5–10% of the sample weight typically indicate that the media needs replenishment or replacement. Confirm against your abrasive specification and the coating manufacturer's requirements.

3. Oil Contamination: Water-Break Test

A simple water-break test can detect hydrophobic contamination from oil or grease.

Procedure:
1. Place a small sample of spent abrasive in a clean glass beaker.
2. Add distilled water to cover the abrasive.
3. Agitate gently and observe the water surface.

Interpretation: an oily sheen or floating droplets on the water surface indicates oil contamination. Clean abrasive produces clear water with no surface film. This test is qualitative—it tells you oil is present but not how much. If the test is positive, investigate the compressed air system (oil carryover from the compressor) and any oil-based coatings on the blasted parts.

4. Soluble Salt Contamination: Conductivity Method

Conductivity testing is the most common quantitative check for ionic contamination, particularly chlorides and sulfates. The method is described in standards such as ISO 11127-6 and ASTM D4940.

Procedure (field method):
1. Weigh a representative sample of spent abrasive (typically 100 grams).
2. Add an equal weight of distilled or deionized water.
3. Agitate the mixture for a specified period (commonly 5 minutes) to dissolve soluble salts.
4. Allow the slurry to settle, then measure the conductivity of the supernatant liquid using a calibrated conductivity meter.
5. Compare the reading against your specification limit.

Interpretation: conductivity limits vary by coating system and specification. A common guideline for non-immersion service is a maximum conductivity of 250–500 µS/cm in the extract solution, but critical applications may require much lower values. Always confirm the acceptable limit with the coating manufacturer and the project specification. If the reading exceeds the limit, the abrasive should not be used for the final blast pass without remediation or replacement.

5. Chloride-Specific Testing

When conductivity is elevated, a chloride-specific test identifies whether chlorides are the primary culprit. Field test kits using titration tubes or chloride-sensitive strips are available and can quantify chloride concentration in the extract solution. This is particularly relevant for stainless steel applications, where chlorides pose a pitting corrosion risk, and for marine coating systems with strict chloride limits.
Common Mistakes in Contamination Control

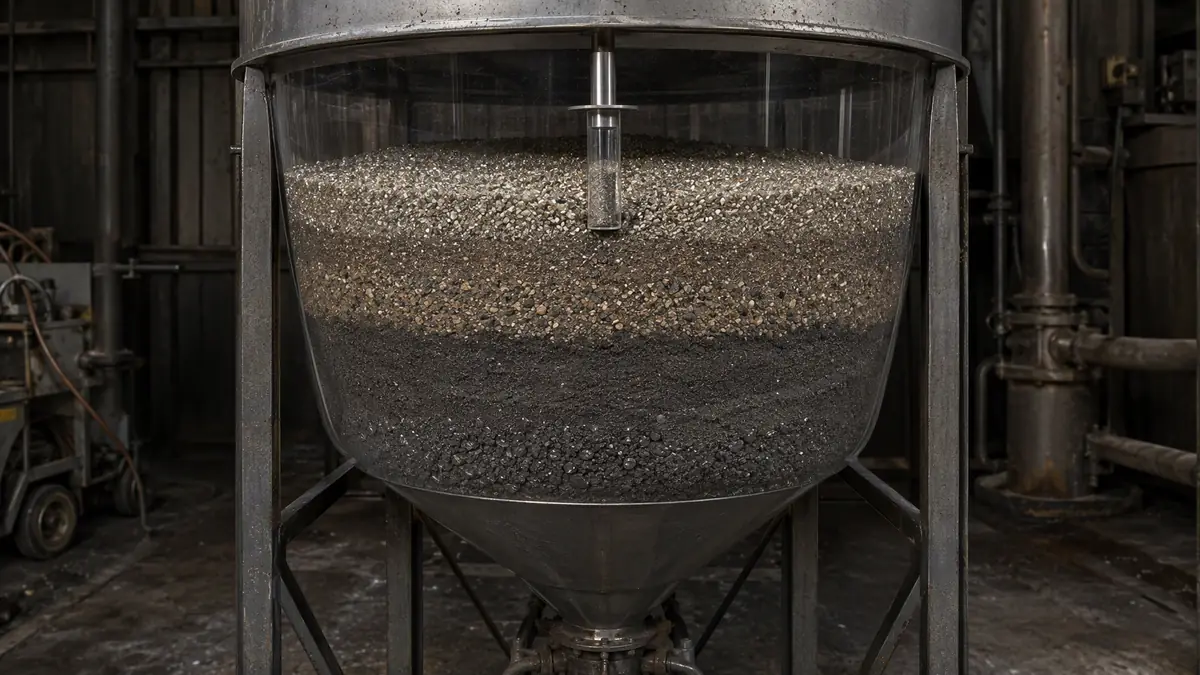
Transparent hopper showing stratified layers of abrasive with a sampling probe only reaching the clean top layer.
A common mistake: sampling only from the top of the hopper misses the dense, contaminated fines that stratify at the bottom.

Photorealistic scene of a transparent media hopper showing stratified layers of clean and contaminated abrasive, with a sampling probe incorrectly inserted only into the top layer, visually explaining the common mistake of unrepresentative sampling discussed in the section.

Transparent hopper showing stratified layers of abrasive with a sampling probe only reaching the clean top layer.

Sampling only from the top of the hopper. Fines and denser contaminants stratify. Take samples from multiple points in the media stream, including the bottom of the storage hopper and the return line.

Testing only when problems appear. By the time a coating defect is visible, contaminated media may have already damaged multiple workpieces. Schedule contamination checks at a frequency based on throughput and substrate condition—daily checks are common in high-production recycling operations.

Ignoring the compressed air supply. Contamination that appears to come from the abrasive may actually originate from compressor oil carryover or moisture in the air line. If oil or water contamination is detected, check the compressor, aftercooler, and moisture separator before discarding the media.

Adding fresh abrasive without removing spent media. Topping up the hopper with fresh abrasive dilutes contaminants but does not remove them. Over time, the working mix accumulates salts and fines. A partial dump-and-replace schedule is more effective than continuous topping-up.

Relying on a single test method. Conductivity alone does not detect oil. A water-break test alone does not quantify chlorides. Use a combination of visual inspection, sieve analysis, and chemical tests appropriate to your coating specification.

Controlling Contamination in the Recycling Loop

Measurement is the first step. Control requires changes to the process.

  • Segregate incoming workpieces by contamination level. Heavily rusted, salt-laden, or oily parts should be pre-cleaned or blasted with expendable media before entering the recycling loop.
  • Maintain the air system. Moisture separators, coalescing filters, and aftercoolers must be drained and serviced on schedule. Compressor oil carryover is a common and preventable source of media contamination.
  • Establish a media replenishment rate. Based on your sieve and conductivity data, determine how much fresh abrasive must be added per ton of throughput to maintain acceptable quality. This is an empirical number specific to your operation.
  • Implement a dump schedule. Even with replenishment, the working mix eventually degrades beyond recovery. Set a maximum allowable conductivity or fines percentage that triggers a full media change.
  • Store fresh abrasive properly. Contamination can occur before the abrasive ever enters the blast pot. Keep fresh media in covered, dry storage away from sources of oil, salt, and moisture.

Conclusion

Spent abrasive contamination is a controllable variable. The key is to measure it consistently, understand what the measurements mean for your coating system, and act before defects appear. A combination of visual checks, sieve analysis, and conductivity testing—performed at a frequency that matches your production rate—will catch most problems early.

The cost of these checks is negligible compared to the cost of a coating failure. For quality and maintenance engineers, building a simple contamination screening routine into the daily workflow is one of the highest-return investments in surface preparation quality.

Frequently Asked Questions

What exactly is spent abrasive contamination?

Spent abrasive contamination is any foreign material that accumulates in recycled blast media and interferes with surface preparation. It includes soluble salts like chlorides, oils and greases from compressors or workpieces, and excessive dust or fines from fractured abrasive particles. Even correctly sized grit can carry a contaminant film that leads to coating failure.

How do I know if my recycled abrasive is too contaminated to reuse?

You can determine this through a combination of practical checks. Visually, look for significant darkening, clumping when squeezed, or excessive dust when pouring. Quantitatively, a conductivity test reading above your coating specification limit (often 250–500 µS/cm) or fines content exceeding 5–10% by weight typically indicates the media needs replenishment or replacement.

What is the quickest way to check for oil in spent abrasive on the plant floor?

The water-break test is a fast, qualitative method. Place a sample of abrasive in a beaker of distilled water, agitate it, and observe the surface. An oily sheen or floating droplets indicate oil contamination, whereas clean abrasive will leave the water clear with no surface film.

When does it make more sense to use fresh abrasive instead of recycling?

Recycling is often a poor fit for single-pass outdoor blasting with expendable slag, heavily contaminated substrates like lead-based paint, or critical coatings with near-zero salt tolerance. If the cost of collection, cleaning, and testing exceeds the cost of fresh media, or if cross-contamination risks are too high, single-use abrasive is the safer choice.

Why is my recycled abrasive causing coating defects even though the particle size is correct?

The defect is likely caused by invisible surface contamination on the abrasive particles, not the particle size. Soluble salts can drive osmotic blistering, and a thin film of oil can compromise adhesion. These contaminants transfer to the blasted surface and are locked in under the new coating, causing premature failure.

What is the most common mistake when sampling abrasive for contamination tests?

The most common mistake is sampling only from the top of the storage hopper. Fines and denser contaminants stratify, so a top sample is not representative. You must take samples from multiple points, including the bottom of the hopper and the media return line, to get an accurate picture of the working mix's condition.

How often should I test my recycled abrasive for contamination?

Testing frequency should be based on your throughput and the condition of the substrates being blasted. In high-production recycling operations, daily checks are common. Relying only on tests after a coating defect appears is too late, as contaminated media may have already damaged multiple workpieces.

Solution

Use the contamination checks described here to assess your current recycling operation. If your spent abrasive is showing elevated conductivity, excessive fines, or oil contamination, it may be time to review your abrasive specification or replenishment schedule.

Explore the range of blast media available for your application, or contact SPA2Z to discuss your surface preparation requirements and confirm the right abrasive grade and contamination limits for your coating system.

Get a quote

Get a quote

Tell us what you need. We reply within one business day.

Sending…
Need a price? Ask us here.